Cognito User Pool is very easy to create and if you are looking for “How to create Cognito User Pool using serverless framework” then you are in the right place.
First we will need to follow a few steps to understand what consists of a Cognito user pool. To discuss this we need to focus to three major items.
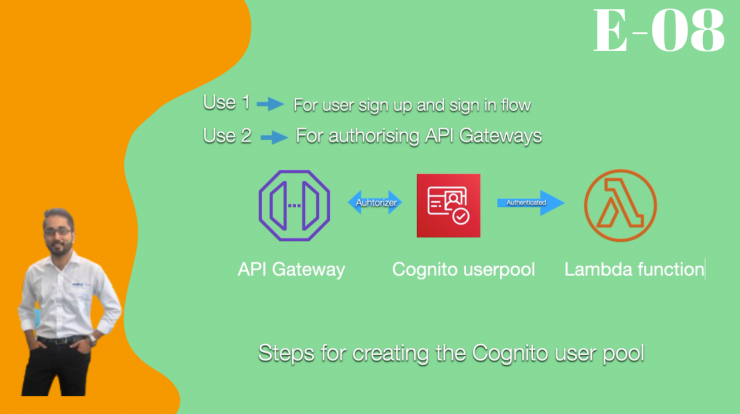
Step 1: Cognito user pool
To start with we should first see the most important part : which is the Cognito user pool itself. In the video above I have explained the below codebase
CognitoUserPool:
    Type: AWS::Cognito::UserPool
    Properties:
      # Generate a name based on the stage
      UserPoolName: ${self:custom.stage}-yttest-user-pool
      # Set email as an alias
      UsernameAttributes:
        - email
      AutoVerifiedAttributes:
        - email
Step 2: CognitoUserPoolClient
The next part is creating an app client .
This would be used by the front end and to integrate with the Cognito user pool. Again in the video above I have explained the below codebase
CognitoUserPoolClient:
    Type: AWS::Cognito::UserPoolClient
    Properties:
      # Generate an app client name based on the stage
      ClientName: ${self:custom.stage}-yttest-user-pool-client
      UserPoolId:
        Ref: CognitoUserPool
      ExplicitAuthFlows:
        - ADMIN_NO_SRP_AUTH
      GenerateSecret: false
      RefreshTokenValidity:"30"
Step 3: Creating an Identity pool
Now next step is for us to create an identity pool for working with our Identity pool. I have explained the code above in the video.
CognitoIdentityPool:
    Type: AWS::Cognito::IdentityPool
    Properties:
      # Generate a name based on the stage
      IdentityPoolName: ${self:custom.stage}yttestsExtIdentityPool
      # Don't allow unathenticated users
      AllowUnauthenticatedIdentities: false
      # Link to our User Pool
      CognitoIdentityProviders:
        - ClientId:
            Ref: CognitoUserPoolClient
          ProviderName:
            Fn::GetAtt: [ "CognitoUserPool", "ProviderName" ]
Step 4: Creating an IAM role for the Identity pool
After we have created the Identity pool we should be creating the necessary IAM role . In the video I have spent time explaining why this IAM role is necessary for us to define.
CognitoIdentityPoolRoles:
    Type: AWS::Cognito::IdentityPoolRoleAttachment
    Properties:
      IdentityPoolId:
        Ref: CognitoIdentityPool
      Roles:
        authenticated:
          Fn::GetAtt: [CognitoAuthRole, Arn]
Step 5: Define the policies for the above declared IAM role for Identity pool
Now we have almost come to the last step and here we are going to define all the policies that are going to be defining the access for the above mention IAM role. In the video I have explained this part as well
CognitoAuthRole:
    Type: AWS::IAM::Role
    Properties:
        Path: /
        AssumeRolePolicyDocument:
          Version: '2012-10-17'
          Statement:
            - Effect: 'Allow'
              Principal:
                Federated: 'cognito-identity.amazonaws.com'
              Action:
                - 'sts:AssumeRoleWithWebIdentity'
              Condition:
                StringEquals:
                  'cognito-identity.amazonaws.com:aud':
                    Ref: CognitoIdentityPool
                'ForAnyValue:StringLike':
                  'cognito-identity.amazonaws.com:amr': authenticated
        Policies:
          - PolicyName: 'CognitoAuthorizedPolicy'
            PolicyDocument:
              Version: '2012-10-17'
              Statement:
                - Effect: 'Allow'
                  Action:
                    - 'mobileanalytics:PutEvents'
                    - 'cognito-sync:*'
                    - 'cognito-identity:*'
                  Resource: '*'
                # Allow users to upload attachments to their
                # folder inside our S3 bucket
                - Effect: 'Allow'
                  Action:
                    - 's3:*'
                  Resource:
                    - Fn::Join:
                      - ''
                      -
                        - 'Fn::ImportValue': ${self:custom.stage}-ExtAttachmentsBucketArn
                        - '/private/'
                        - '$'
                        - '{cognito-identity.amazonaws.com:sub}/*'
While following this post on “How to create Cognito User Pool using serverless framework”, you might be wondering about all the serverless variables ? In that case you are free to replace all resources with your own ones. It should work perfectly fine. I shall also share the codebase in this GitHub repo.
You should check out this repo in case you want to use the whole repo
Step 6: Export the necessary resources
Now in this step we need to export the necessary resources for integrating with the front end. And for this purpose we will need to export the below three resources.
- UserPoolId
- UserPoolClientId
- IdentityPoolId
Now in this part let’s see the code for the above resources
Resource 1: UserPoolId
The code below will be exporting from the above stack
UserPoolId:
    Value:
      Ref: CognitoUserPool
Resource 2: UserPoolClientId
The code below will be exporting from the above stack
UserPoolClientId:
    Value:
      Ref: CognitoUserPoolClient
Resource 2: IdentityPoolId
The code below will be exporting from the above stack
IdentityPoolId:
    Value:
      Ref: CognitoIdentityPool
All right ,so far if you have followed the above steps it would be interesting for you to see the final consolidated code. Here is the entire resource .
Cognito-user-pool.yml
Cognito-user-pool.yml
Resources:
  CognitoUserPool:
    Type: AWS::Cognito::UserPool
    Properties:
      # Generate a name based on the stage
      UserPoolName: ${self:custom.stage}-yttest-user-pool
      # Set email as an alias
      UsernameAttributes:
        - email
      AutoVerifiedAttributes:
        - email

  CognitoUserPoolClient:
    Type: AWS::Cognito::UserPoolClient
    Properties:
      # Generate an app client name based on the stage
      ClientName: ${self:custom.stage}-yttest-user-pool-client
      UserPoolId:
        Ref: CognitoUserPool
      ExplicitAuthFlows:
        - ADMIN_NO_SRP_AUTH
      GenerateSecret: false

   # The federated identity for our user pool to auth with
  CognitoIdentityPool:
    Type: AWS::Cognito::IdentityPool
    Properties:
      # Generate a name based on the stage
      IdentityPoolName: ${self:custom.stage}yttestsExtIdentityPool
      # Don't allow unathenticated users
      AllowUnauthenticatedIdentities: false
      # Link to our User Pool
      CognitoIdentityProviders:
        - ClientId:
            Ref: CognitoUserPoolClient
          ProviderName:
            Fn::GetAtt: [ "CognitoUserPool", "ProviderName" ]
  # IAM roles
  CognitoIdentityPoolRoles:
    Type: AWS::Cognito::IdentityPoolRoleAttachment
    Properties:
      IdentityPoolId:
        Ref: CognitoIdentityPool
      Roles:
        authenticated:
          Fn::GetAtt: [CognitoAuthRole, Arn]

  # IAM role used for authenticated users
  CognitoAuthRole:
    Type: AWS::IAM::Role
    Properties:
        Path: /
        AssumeRolePolicyDocument:
          Version: '2012-10-17'
          Statement:
            - Effect: 'Allow'
              Principal:
                Federated: 'cognito-identity.amazonaws.com'
              Action:
                - 'sts:AssumeRoleWithWebIdentity'
              Condition:
                StringEquals:
                  'cognito-identity.amazonaws.com:aud':
                    Ref: CognitoIdentityPool
                'ForAnyValue:StringLike':
                  'cognito-identity.amazonaws.com:amr': authenticated
        Policies:
          - PolicyName: 'CognitoAuthorizedPolicy'
            PolicyDocument:
              Version: '2012-10-17'
              Statement:
                - Effect: 'Allow'
                  Action:
                    - 'mobileanalytics:PutEvents'
                    - 'cognito-sync:*'
                    - 'cognito-identity:*'
                  Resource: '*'
                # Allow users to upload attachments to their
                # folder inside our S3 bucket
                - Effect: 'Allow'
                  Action:
                    - 's3:*'
                  Resource:
                    - Fn::Join:
                      - ''
                      -
                        - 'Fn::ImportValue': ${self:custom.stage}-ExtAttachmentsBucketArn
                        - '/private/'
                        - '$'
                        - '{cognito-identity.amazonaws.com:sub}/*'

  # Print out the Id of the User Pool and Identity Pool that are created
Outputs:
  UserPoolId:
    Value:
      Ref: CognitoUserPool

  UserPoolClientId:
    Value:
      Ref: CognitoUserPoolClient

  IdentityPoolId:
    Value:
      Ref: CognitoIdentityPool

  CognitoAuthRole:
    Value:
      Ref: CognitoAuthRole
    Export:
      Name: YTTest-ExtCognitoAuthRole-${self:custom.stage}
Thank you for visiting this page . For more information on AWS Cognito user pool, please visit the AWS Cognito official documentation here
.
How can i write the access token expiration in yml file ?
Hi Sarmad,
Please see the updated “CognitoUserPoolClient” section. You need to use the “RefreshTokenValidity” property , and set the value respectively. I have set it to be 30 for now
Hi Codegigs, thanks for the tutorial.
I guess the part I’m missing is in which way you authenticate against Cognito to ensure the token sent to the API Gateway in the Authorization Header. I’m getting this token currently using federated login with amplify, but it seems that the lambda does not assume the sts:AssumeRoleWithWebIdentity is not happening based on the error I get from the lambda that writes to S3.
Hi Fabricio,
Thanks for posting the query. Well as you already have the token from amplify, can you use the Storage module and put your file?
let’s say you are writing a function like this ! would the below function be good for your scenario ?
Here the Storage takes care of the S3 authentication. And this needs the amply to be setup. I am using react, and I had setup amplify on my “index.js”!
This function Writes to S3
import { Storage } from "aws-amplify";

export async function s3Upload(file,subfolder) {
  const filename = `${Date.now()}-${file.name}`;

  const stored = await Storage.vault.put(subfolder+'/'+filename, file, {
    contentType: file.type,
  });

  return stored.key;
}