how to create a restful web service with Java
We shall be building the restful web service using the below technology stack.
-
-
- Java Spring boot
- Maven ( build tool )
- Jackson ( request mapper )
-
Let’s consider that we already have setup the local development box for developing with Java.
Lets follow the below steps for creating a new project bundle from spring inilizr.
-
-
-
- Go to Spring Initializr
- Select all the options for you project name , description, package name, build tool of choice ( maven in our example ) and also the method for deployment ( “jar” in our case for simplicity )
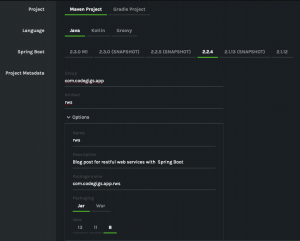
- Now click on the Generate button to generate the zip and then download the zip and extract it to a folder and then open the project with IntelliJ

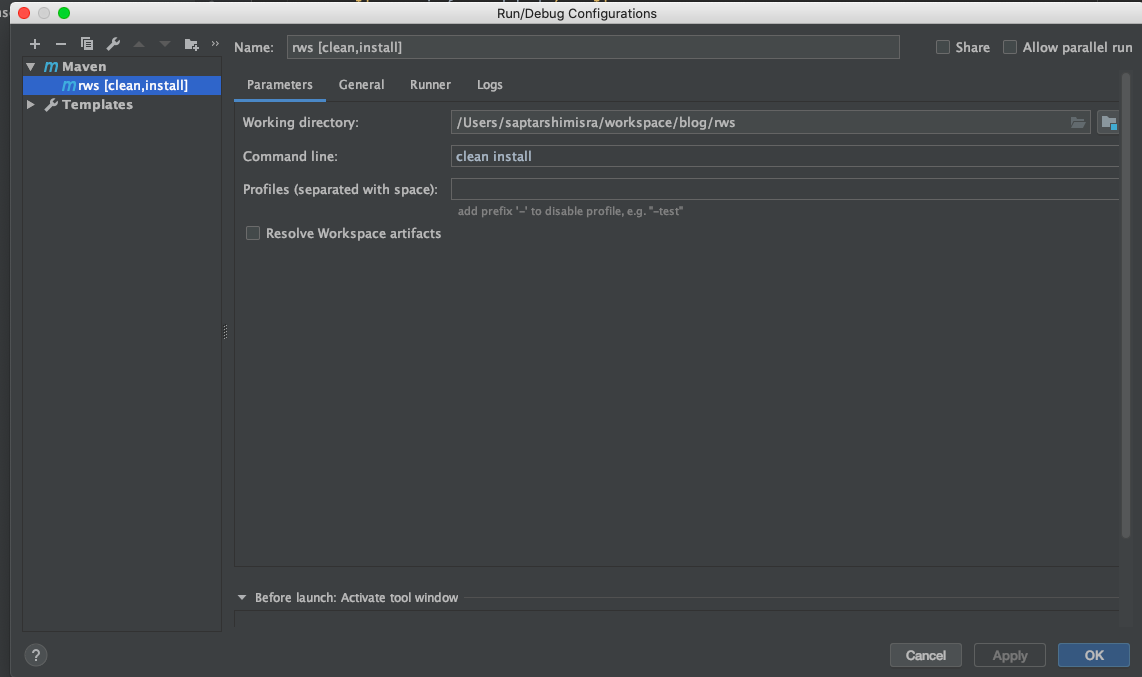
- Next create a maven build configuration inside IntelliJ and wait for the initial scanning of the project to be finished. Once the project is loaded and scanned, we may choose to run the build for the first time.
- Now we can see that there is the below folder structure created already. And we need to navigate to the src/main/java/ directory and open
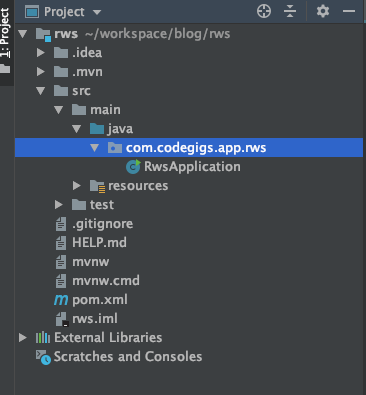
RwsApplication.java
package com.codegigs.app.rws;

import org.springframework.boot.SpringApplication;
import org.springframework.boot.autoconfigure.SpringBootApplication;

@SpringBootApplication
public class RwsApplication {

	public static void main(String[] args) {
		SpringApplication.run(RwsApplication.class, args);
	}

}
The above code signify that the entry point for our service is RwsApplication.java.
- Now we should be writing our @Restcontroller class to be able to create endpoints.
- Before we can jump in to start writing our controller, we should modify our pom.xml file to use the correct dependency. We need to use
<artifactId>spring-boot-starter-web</artifactId>
instead of
<artifactId>spring-boot-starter</artifactId>
The updated dependency should be like below
<dependency>
   <groupId>org.springframework.boot</groupId>
   <artifactId>spring-boot-starter-web</artifactId>
</dependency>
What do we get additionally by using the above dependency ?
We get the embedded tomcat on which our endpoints will be deployed. Yes you read that correctly. We are not going to add any additional dependency or configuration for the tomcat. It shall be provided and configured and launched automatically for us by “sprong-boot-starter-web”
- Also we are going to update the package for our @RestController. Here is the updated code for the @RestController.
package com.codegigs.app.rws.controllers.test;

import org.springframework.web.bind.annotation.RequestMapping;
import org.springframework.web.bind.annotation.RestController;

@RestController
public class TestController {
    @RequestMapping("/test")
    public String doTest() {
        return "{\"response\":\"test\"}";
    }
}
As you can see we have the package created and the controller has the updated package name mentioned at the very first line
- Now if we do a man clean install and then run the @SpringBootApplication file (RwsApplication.java in our case), we will notice that tomcat has started on port # 8080 and will that it has exposed the endpoint “/test”.
  .   ____          _            __ _ _
 /\\ / ___'_ __ _ _(_)_ __  __ _ \ \ \ \
( ( )\___ | '_ | '_| | '_ \/ _` | \ \ \ \
 \\/  ___)| |_)| | | | | || (_| |  ) ) ) )
  '  |____| .__|_| |_|_| |_\__, | / / / /
 =========|_|==============|___/=/_/_/_/
 :: Spring Boot ::        (v2.2.4.RELEASE)

2020-02-16 22:19:10.611  INFO 2489 --- [           main] com.codegigs.app.rws.RwsApplication      : Starting RwsApplication on 192.168.1.5 with PID 2489 (/Users/saptarshimisra/workspace/blog/rws/target/classes started by saptarshimisra in /Users/saptarshimisra/workspace/blog/rws)
2020-02-16 22:19:10.616  INFO 2489 --- [           main] com.codegigs.app.rws.RwsApplication      : No active profile set, falling back to default profiles: default
2020-02-16 22:19:12.532  INFO 2489 --- [           main] o.s.b.w.embedded.tomcat.TomcatWebServer  : Tomcat initialized with port(s): 8080 (http)
2020-02-16 22:19:12.548  INFO 2489 --- [           main] o.apache.catalina.core.StandardService   : Starting service [Tomcat]
2020-02-16 22:19:12.549  INFO 2489 --- [           main] org.apache.catalina.core.StandardEngine  : Starting Servlet engine: [Apache Tomcat/9.0.30]
2020-02-16 22:19:12.649  INFO 2489 --- [           main] o.a.c.c.C.[Tomcat].[localhost].[/]       : Initializing Spring embedded WebApplicationContext
2020-02-16 22:19:12.650  INFO 2489 --- [           main] o.s.web.context.ContextLoader            : Root WebApplicationContext: initialization completed in 1876 ms
2020-02-16 22:19:12.912  INFO 2489 --- [           main] o.s.s.concurrent.ThreadPoolTaskExecutor  : Initializing ExecutorService 'applicationTaskExecutor'
2020-02-16 22:19:13.183  INFO 2489 --- [           main] o.s.b.w.embedded.tomcat.TomcatWebServer  : Tomcat started on port(s): 8080 (http) with context path ''
2020-02-16 22:19:13.187  INFO 2489 --- [           main] com.codegigs.app.rws.RwsApplication      : Started RwsApplication in 3.407 seconds (JVM running for 4.16)
2020-02-16 22:19:18.695  INFO 2489 --- [nio-8080-exec-1] o.a.c.c.C.[Tomcat].[localhost].[/]       : Initializing Spring DispatcherServlet 'dispatcherServlet'
2020-02-16 22:19:18.695  INFO 2489 --- [nio-8080-exec-1] o.s.web.servlet.DispatcherServlet        : Initializing Servlet 'dispatcherServlet'
2020-02-16 22:19:18.704  INFO 2489 --- [nio-8080-exec-1] o.s.web.servlet.DispatcherServlet        : Completed initialization in 9 ms
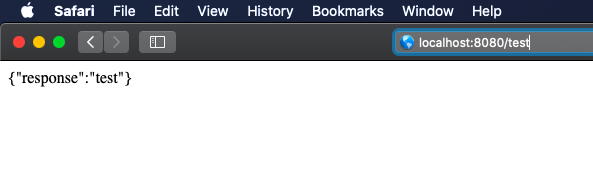
- Now we may choose to visit the endpoint http://localhost:8080/test And we shall notice that it exposes the very same json that we had returned at line number #10 of point # 9, @ TestController.java class
Hooray !!! You’ve created your first rest api with Spring boot. I shall move on to talk about other stuffs with Spring boot that would help you readers to build more spophisticated Spring boot rest Api endpoints while securing the endpoints and also scaling them so that the services can support more usages . Keep reading !
-
-